
How to prototype apps and side projects using AI toolsA detailed tutorial to building your first ai-powered project✨ Hey there this is a free edition of next play’s newsletter, where we share under-the-radar opportunities to help you figure out what’s next in your journey. For more: check out the Friends of Next Play Community Slack and Product Discount Bundle. There is plenty of buzz these days highlighting the power of artificial intelligence—but how do you actually use AI in a productive way? That’s the type of question we hear often from people in the Next Play community. They are exploring building a new project or joining a startup and are wondering if and how it makes sense to leverage AI. Maybe they want to leverage some AI tools at work. Maybe they want to build something that helps them find and get a a new job. There are many possibilities. But one suggestion we have is that you should start playing around with the tools yourself before you get carried away with the hype. It’s one thing to read lots of essays, and yes the headlines are exciting, but, until you actually get into the weeds and make things yourself, it is hard to know whether or not this technology will actually be useful to you and your use case. The good news is that it’s getting easier and easier to get started—and so we thought it’d be productive to chat with Harold Dijkstra and Ciara Wearen—the instructors behind the “Prototyping with AI Bootcamp.” They’ve helped 1200+ tech professionals ship their first ai-powered app (using tools like Replit, Bolt, Lovable, Supabase, v0, and others). We asked them to give us an example tutorial—some resource a curious person could lock in on for a few hours and walk away with a working prototype (and also leave with lots of inspiration for future projects). And because you’re reading Next Play, you can get $100 off their popular bootcamp using the code NEXTPLAY. Also check out their upcoming free lesson on Maven to get started with vibe coding. Thanks to them and Maven for supporting Next Play.
How to build a Full Stack AI-powered App:We put together a complete tutorial that leverages Bolt. IntroductionThis tutorial will guide you through building a complete AI-powered meeting summarizer application using Bolt.new, a web-based development platform. By the end of this tutorial, you'll have created a fully functional app that includes user authentication, AI meeting transcription, and summarization and premium subscription features powered by Stripe. What you'll build:
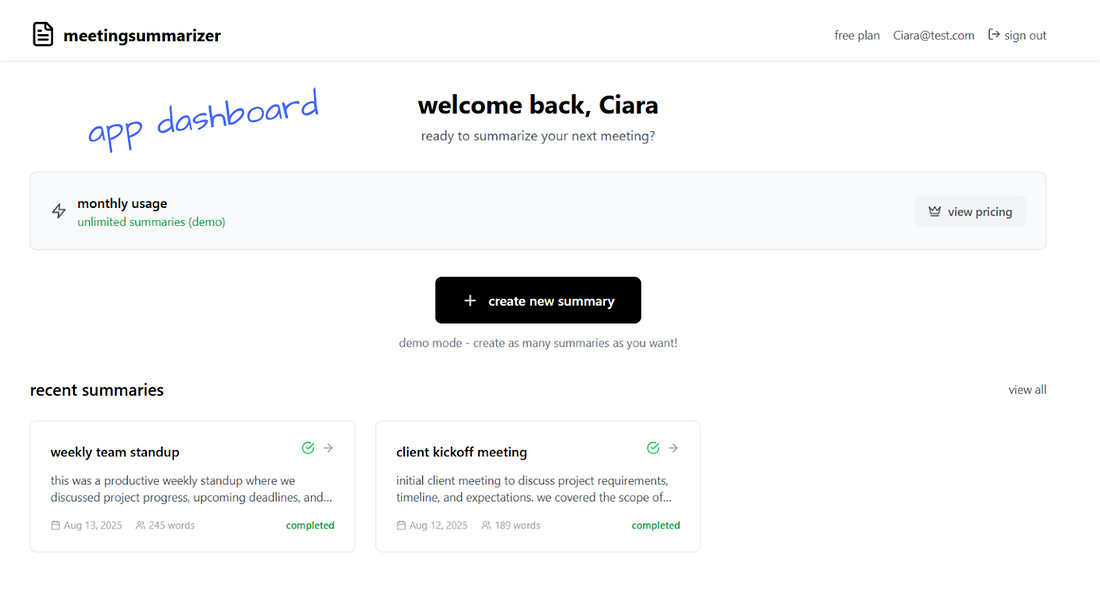
You can check out a demo here. (Note, styling considerations were not prioritized in this demo - instead it’s all about getting the basic functionality working)
Prerequisites:
Video walkthroughPhase 1: Creating the Initial Project PromptStep 1: Generate Your Project Prompt Start by using ChatGPT or Claude to create an optimized prompt for Bolt.new. You can use voice input to describe your idea naturally. Example input to your AI assistant: "I want to build a meeting summarizer app that transcribes audio recordings and creates AI summaries. Users should be able to log in, save their meeting transcripts, and access premium features through a subscription."
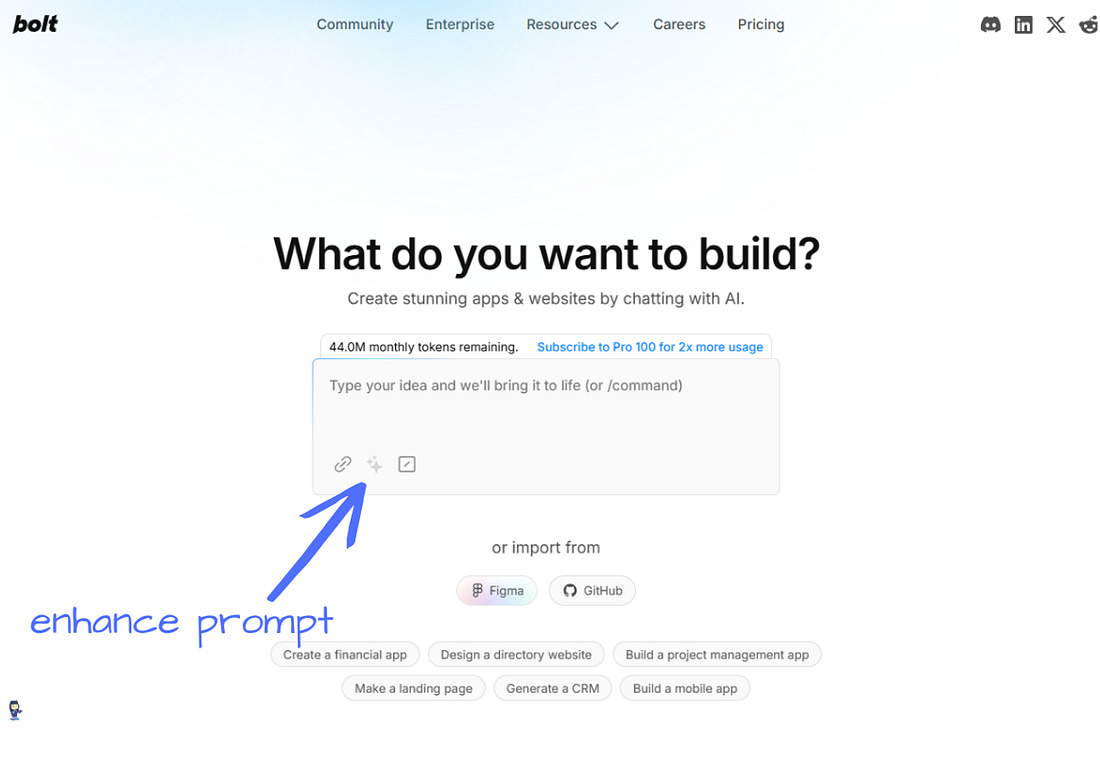
This prevents Bolt from rushing ahead and allows you to review each development phase. Step 2: Input Your Prompt into Bolt.new 1. Navigate to Bolt.new 2. Paste your enhanced prompt into the main input field 3. Optional: Use the "Enhance prompt" feature to get an optimized version 4. Pro tip: Run both the original and enhanced prompts side-by-side in separate tabs to compare results
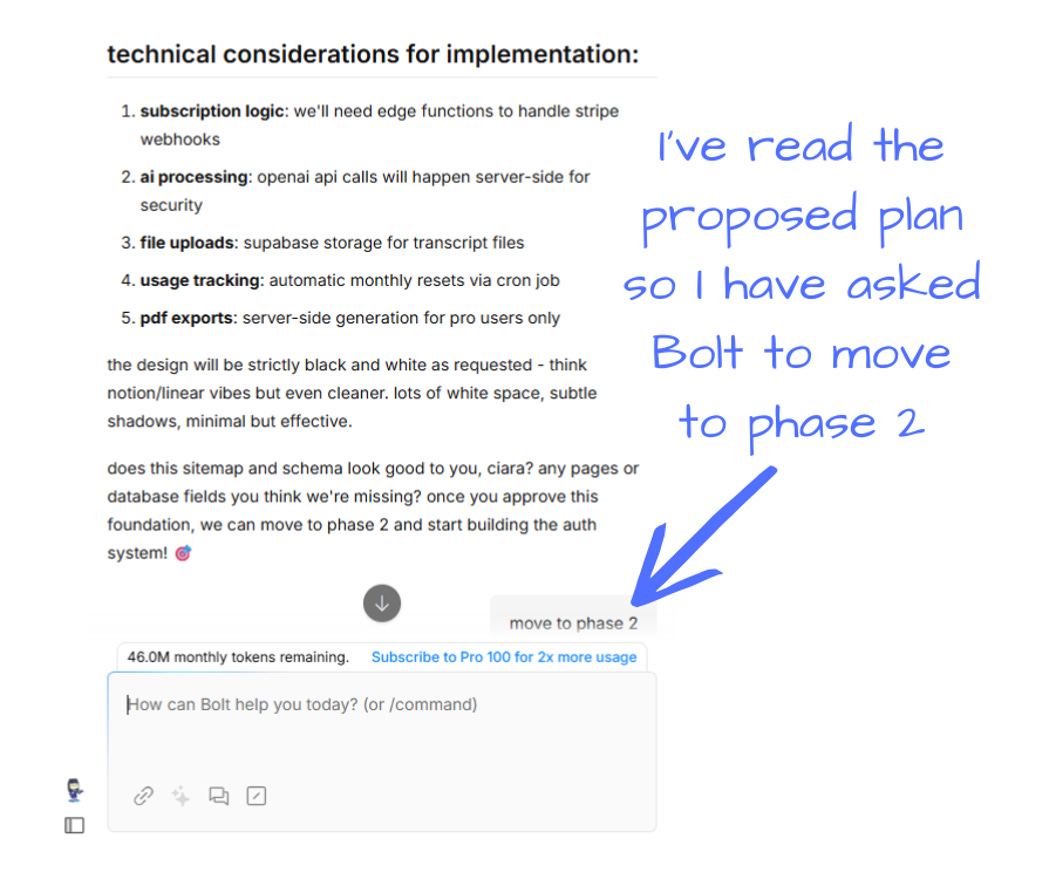
Phase 2: Project Planning and ApprovalStep 3: Review Bolt's Development Plan Bolt will analyze your prompt and present a detailed development plan breaking down the project into phases. This typically includes:
Decision point: You have two options here:
Example modifications you might request:
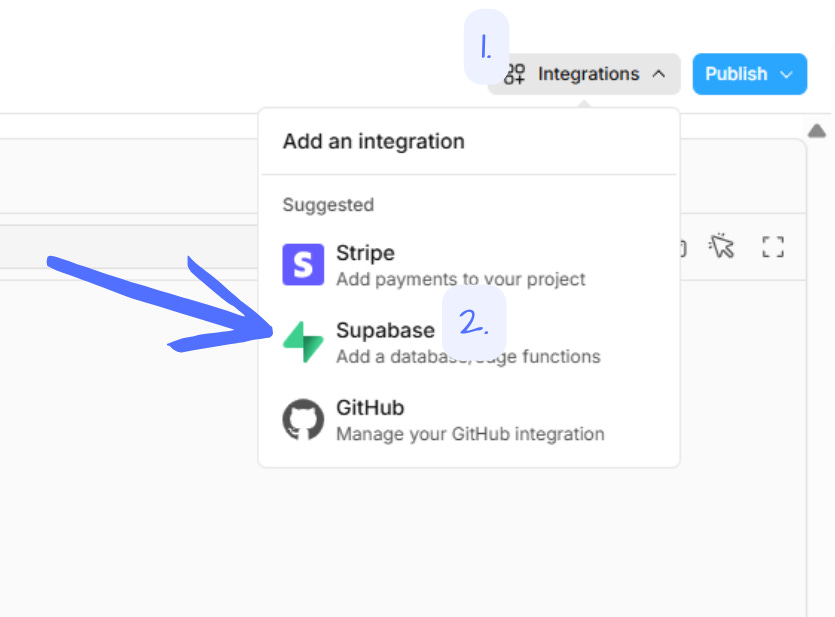
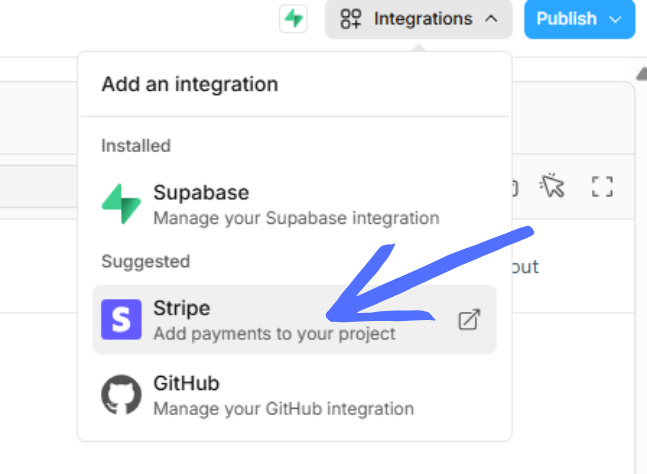
Phase 3: Database and Backend SetupStep 4: Connect Supabase Integration Supabase serves as your Backend-as-a-Service (BaaS) solution, handling multiple critical functions: Core Supabase functions:
Connection process: 1. When prompted by Bolt, click "Connect Supabase" 2. First time users: Follow the authorization flow to grant access 3. Returning users: Click "Create a new project" 4. Project setup: Enter a descriptive project name (e.g., "meeting-summarizer-app") Create a secure password (save this in your password manager) Select the region closest to your location for optimal performance 5. Click "Create new project"
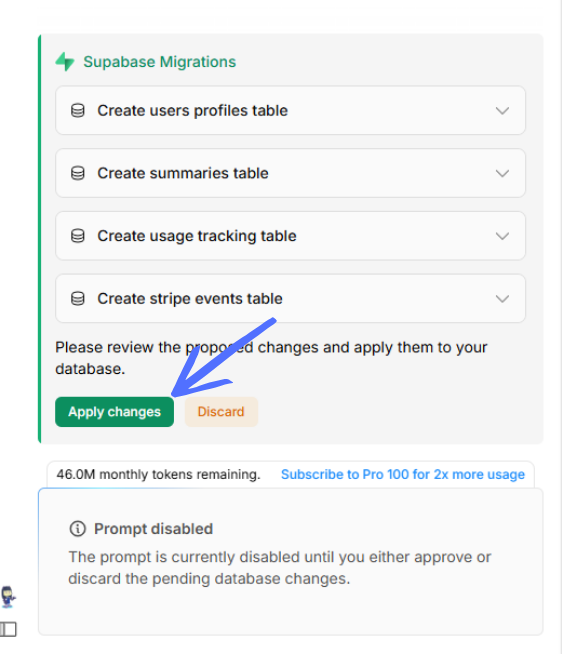
Step 5: Database Migration Bolt will request permission to apply "Supabase Migrations." This migrations process:
Action required: Click "Apply Changes" when prompted.
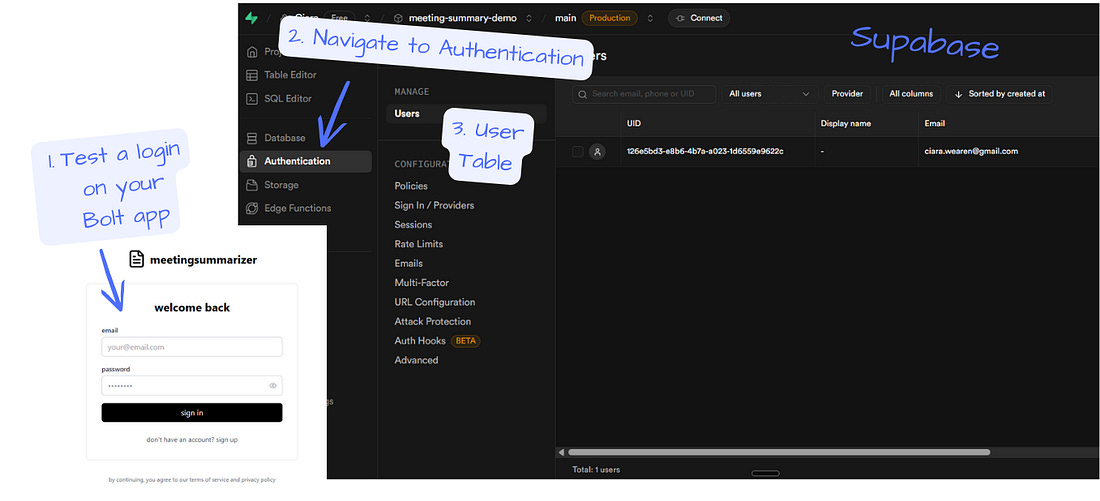
Phase 4: Authentication TestingStep 6: Test User Registration and Login Testing process: 1. Locate the login form Bolt created in your application 2. Create a test user account with a valid email and password 3. Verify the login process works correctly 4. Verification step: Navigate to your Supabase dashboard
Troubleshooting: If login fails, common issues include:
Phase 5: Iterative DevelopmentStep 7: Navigate Through Development Phases Process for each development phase: 1. Enable Discussion Mode: This allows detailed conversation with Bolt about implementation details 2. Request phase planning: Ask "What's the next phase? Explain your plan" 3. Review the plan: Bolt will outline specific features and implementation steps 4. Approve implementation: Click the blue "Implement Phase X" button 5. Test functionality: Always test new features immediately after implementation 6. Iterate as needed: Provide feedback and request adjustments Example build progression:
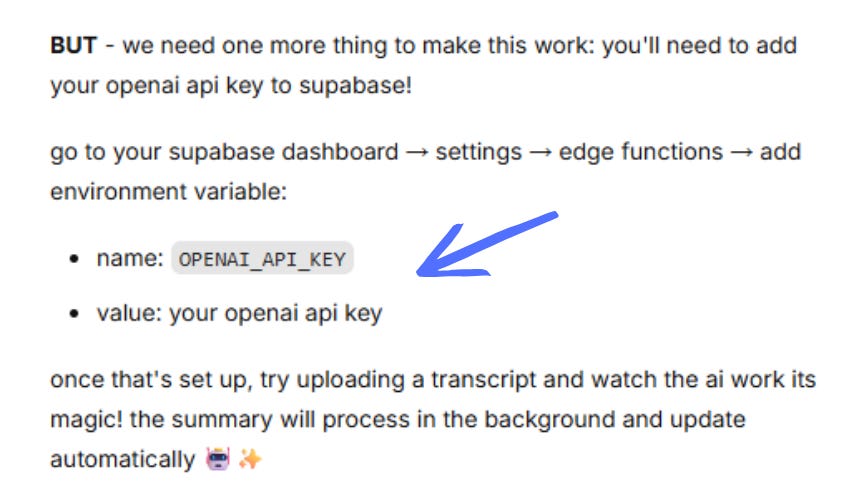
As AI is non-deterministic, your build progression and phases might be different. Phase 6: AI Integration SetupStep 8: OpenAI API Configuration Obtaining your API key: 1. Visit OpenAI's API key page: https://platform.openai.com/settings/organization/apikeys 2. Account setup: Create an account if you don't have one 3. Billing requirement: Add at least $5 to your account balance 4. Key creation: Click "Create a New Key" and follow the prompts 5. Security: Copy the key immediately (it won't be shown again)
Storing the API key securely: 1. Navigate to your Supabase dashboard 2. Go to Edge Functions → Secrets 3. Click "Add Environment Variable" 4. Variable name: ‘OPENAI_API_KEY’ 5. Value: Paste your OpenAI API key 6. Save the configuration
Step 9: Testing AI FunctionalityVerification steps: 1. Upload a test file or paste sample meeting text 2. Trigger the AI summarization process 3. Quality check: Review the generated summary for:
4. Iteration: If results don't meet expectations, work with Bolt to refine the AI prompt Common prompt improvements:
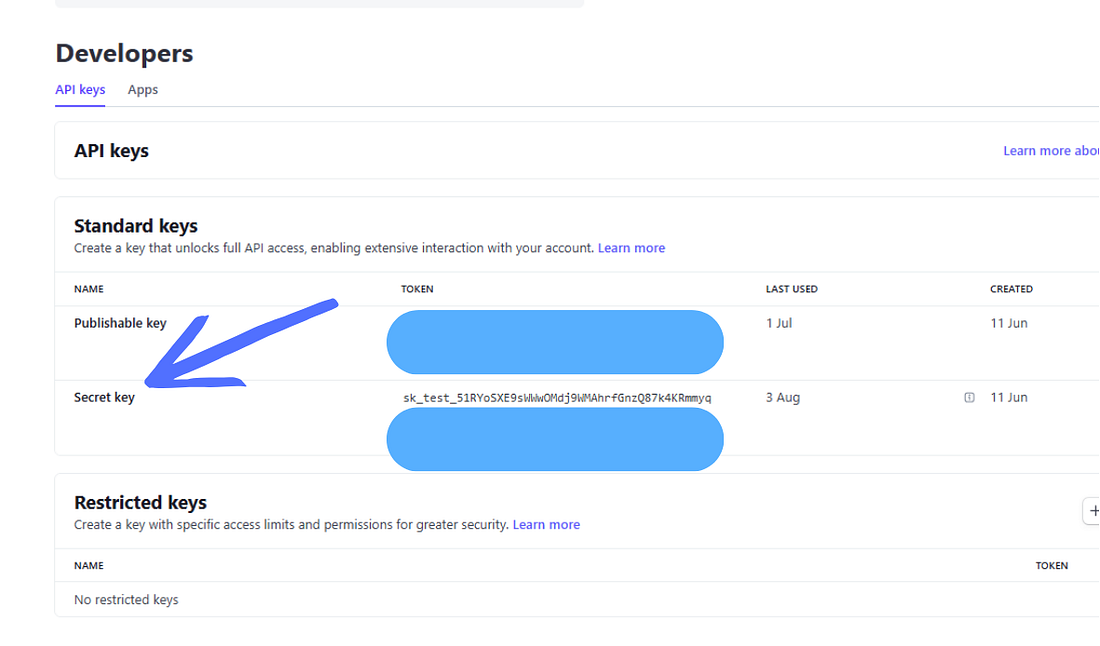
Phase 7: Payment System IntegrationStep 10: Stripe Setup and Configuration Stripe account preparation: 1. Create a Stripe developer account at stripe.com 2. Test environment: Ensure you're working in test mode 3. Product creation: Navigate to Products here: https://dashboard.stripe.com/test/products
API key integration: 1. Get your test API key from Stripe's API keys page here: https://dashboard.stripe.com/test/apikeys 2. Key format: Look for keys starting with ‘sk_test_’ 3. Bolt integration: Click "Add Stripe Key" in Bolt
Payment testing: 1. Use Stripe's test card numbers for verification 2. Test card: 4242 4242 4242 4242 (Visa) 3. Expiry: Any future date 4. CVC: Any 3digit number 5. Verify the complete subscription flow works correctly Phase 8: Enhancement and OptimizationOptional Improvements Landing page creation:
Meeting management features:
AI prompt optimization:
Troubleshooting GuideCommon Error Resolution: "Potential Problem Detected Error": 1. Do not click the automatic "Attempt Fix" button 2. Instead: Click the dropdown arrow to expand error details 3. Copy the complete error message 4. Enable Discussion Mode in Bolt 5. Provide context: Explain what action you were taking when the error occurred 6. Paste the error text and ask Bolt for a specific solution Database connection issues:
API integration problems:
You now have a complete AI-powered meeting summarizer application with:
Next steps for deployment:
This foundation can be extended with additional features like team collaboration, integration with calendar applications or advanced AI capabilities as your user base grows. Reminder, you can check out a demo here. (Note, styling considerations were not prioritized in this demo - instead it’s all about getting the basic functionality working) And because you’re reading Next Play, you can get $100 off the popular prototyping with AI bootcamp using the code NEXTPLAY. Also check out their upcoming free lesson on Maven to get started with vibe coding. Thanks to them and Maven for supporting Next Play.
You're currently a free subscriber to next play. For the full experience, upgrade your subscription.
|
How to prototype apps and side projects using AI tools
Thursday, 14 August 2025


Subscribe to:
Post Comments (Atom)


No comments:
Post a Comment